
Introduction
In this article, I will explain the easy(fake) soft body simulation with Niagara.
The word “fake” is used because, although it is a soft body simulation based on PBD (Position Based Dynamics), it is not a proper soft body simulation because the constraint conditions are very simple and there is no volume preservation constraint condition. This is because it is not a proper Soft Body Simulation.
But I still think it looks great and most importantly, it’s very easy to implement.
Let’s look at the implementation method!
I provide a sample of the fake soft body simulation which is explained here. If you want actual working data right away, please check it out.
https://heyyohanashima.gumroad.com/l/rbtwx
Version
Unreal Engine 5.2.0
Summary
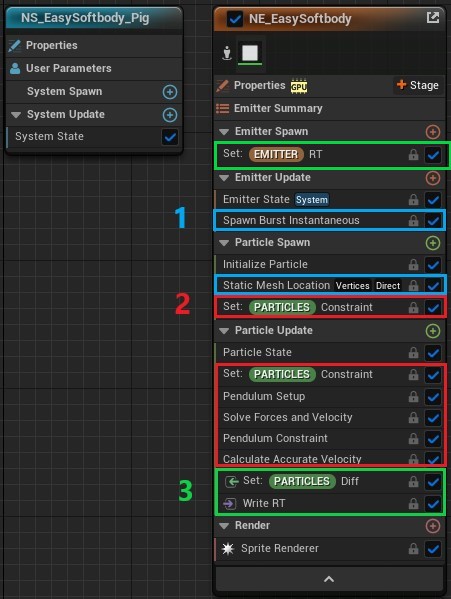
To briefly explain how it works, a particle placed at each vertex of the target mesh in Niagara is moved by fake soft body simulation using the Pendulum module, the difference of the movement is written to Render Target every frame, and then the vertices of the mesh are actually moved by the WorldPositionOffset in its material.
The overall view of Niagara is shown in the image below, and the color-coded numbers correspond to the numbers in the steps below. It must also be a GPU Sim in order to write to the Render Target.
手順
- Place a particle at each vertex of a mesh
- Set up Pendulam module
- Write particle movement differences to Render Target
- Deform the mesh by World Position Offset in its material
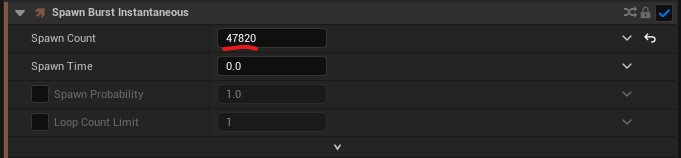
1. Place a particle at each vertex of a mesh
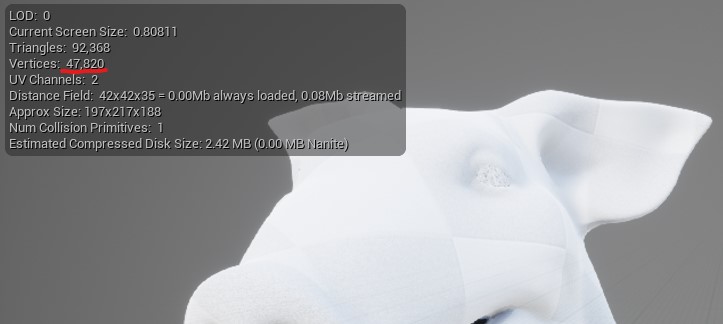
First, check the number of vertices in the target mesh, and generate the same number of particles with Spawn Burst Instantaneous.
Next, use Static Mesh Location module to assign the target mesh.
To generate one particle at each vertex of a mesh, set the Mesh Sampling Type to Vertices, the Vertex Sampling Mode to Direct Vertex, and the Execution Index to Vertex ID.
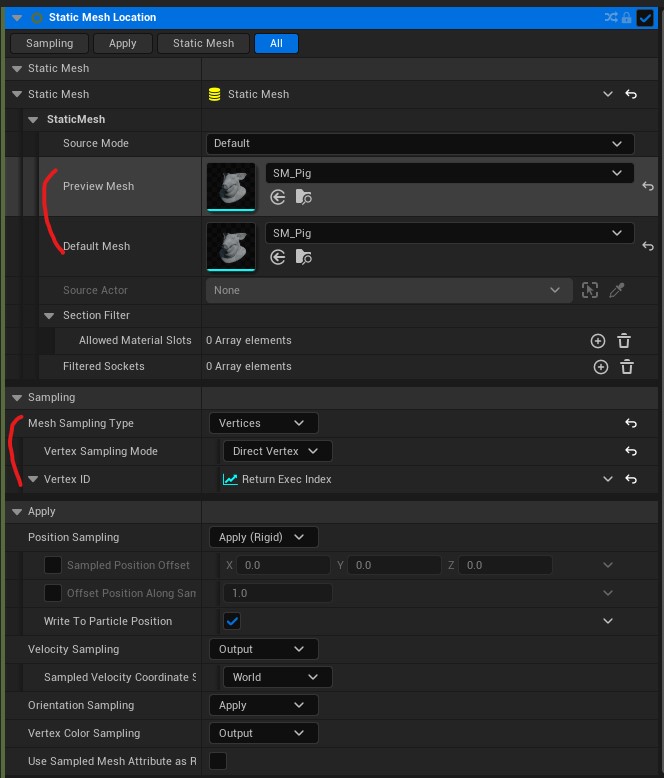
The Execution Index is the serial number of the paritcles when they are generated with Spawn Burst Instantaneous, so if the same number of vertices are generated, the ID of the Mesh vertex and the Execution Index of the Particle will correspond one to one.
Now we have placed one Particle on each vertex of the Mesh.
2. Set up Pendulum module
Using the Pendulum module provided by default by Epic, fake soft body simulation can be easily achieved.
I will not go into the details of how the Pendulum module works at this time, as I will explain it in another article.
A simple explanation is that the PBD (Position Based Dynamics) method, which creates constraints (Constraints) on the relative position of each Particle (length and direction from a certain point) and then moves the Particle to satisfy those constraints.
In this section, we will only describe the settings for Constraint and Pendulum Setup.
Basically, since it is necessary to preserve the shape of the target mesh in this case, Constraint is simply a vector from the mesh’s Pivot (the origin of the Niagara System) to each vertex.
Then, to accommodate rotation, Constraint is rotated according to the Rotation value of the Niagara System.


In Pendulum Setup module, put the length of the Constraint in Pendulum Length and the Constraint in Pendulum Rest Axis.
A value called Spring Driven Constraint (Tightness) controls the firmness of the soft body, so set a User Parameter to change it from the outside.
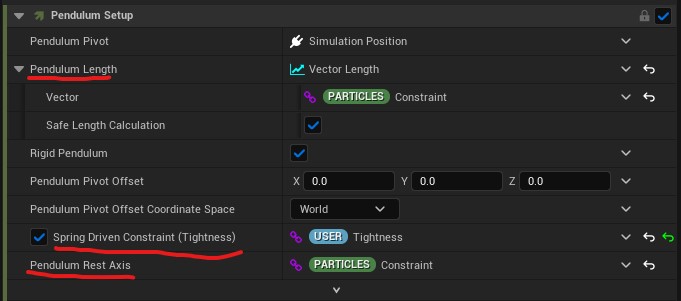
The other modules must be added when you put in Pendulum Setup or you will get an error, so you can add them just by pressing Fix Issue in the error. There is no need to change any particular setup values, so I will skip the explanation.
Now we have a Fake Soft Body Simulation for Particle. It is very easy!
3. Writes the difference of Particle’s movement to Render Target
Next, write to the Render Target to move the target mesh vertex itself using the Particle’s movement information.
First, let’s set up Render Target.
Within Niagara, create Render Target 2D in Emitter Attributes and Texture Render Target parameters in User Parameters.
Render Target to write needs to be created in content browser also.
Next, set the Render Target you created to Texture Render Target in User Parameters.

In the Emitter Spawn section, set the Size and the Render Target 2D you created to Render Target User Parameter. When the size is set here, the size of the Render Target is also automatically determined, so there is no need to set the size on the asset side.
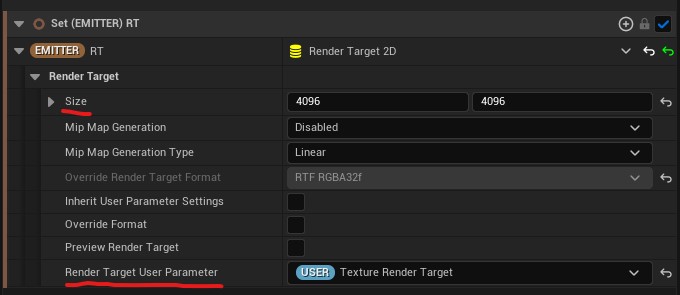
This time, we are using 4096 x 4096, which is quite large. However, since the UVs of the target mesh are used to write values into the Render Target, the size of the Render Target’s texel must be smaller than the difference in the UVs of each vertex (since the information of different vertices (Particles) cannot be written to the same texel). In this example, the resolution of the Render Target had to be increased.
There are various ways to optimize this, such as reducing the number of vertices, UV expansion, and minimizing the number of Texels to be written by baking the vertex numbers into Vertex Color instead of using UVs for writing.
Now, I digressed a bit, but the next thing we need is the movement difference of the Particle. This time, we will create a parameter called Diff and calculate it every frame as follows.
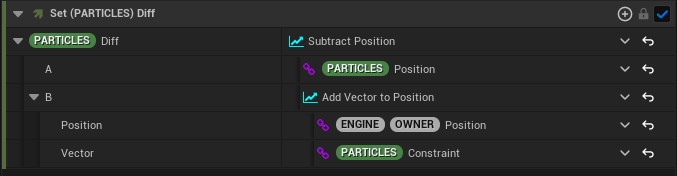
Since Constraint is a vector from the target mesh’s Pivot to each vertex, the position added to ENGINE OWNER Position is the position of each vertex in the target mesh before deformation at that time.
By subtracting this value from the current Position, the difference in movement of the Particle by Fake Soft Body Simulation can be obtained, and by using this value in the World Position Offset of the target Mesh’s material, the Mesh itself can be deformed.
Therefoe, we just need to write this Diff to Render Target.
Finally, let’s look at the implementation of writing to the Render Target in Scratch Pad.
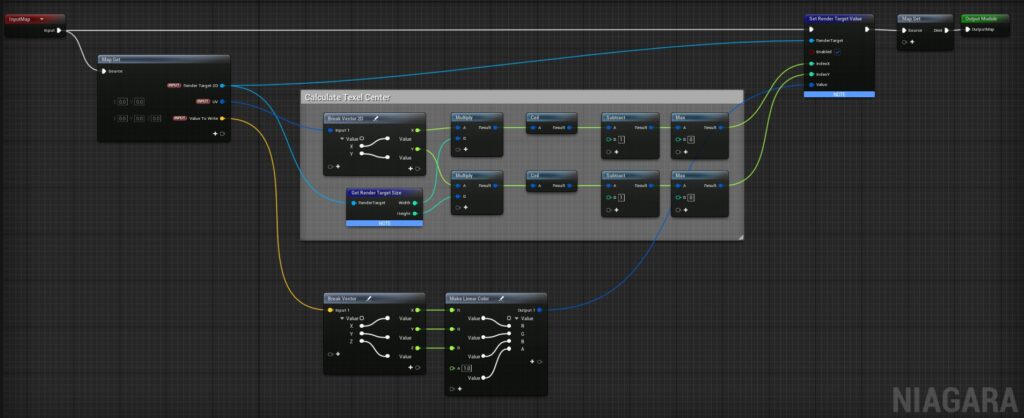
First, Input is set as follows: UV is set to the value of the UV information of the vertex, which can be obtained when the Particle is placed at each vertex in the Static Mesh Location.

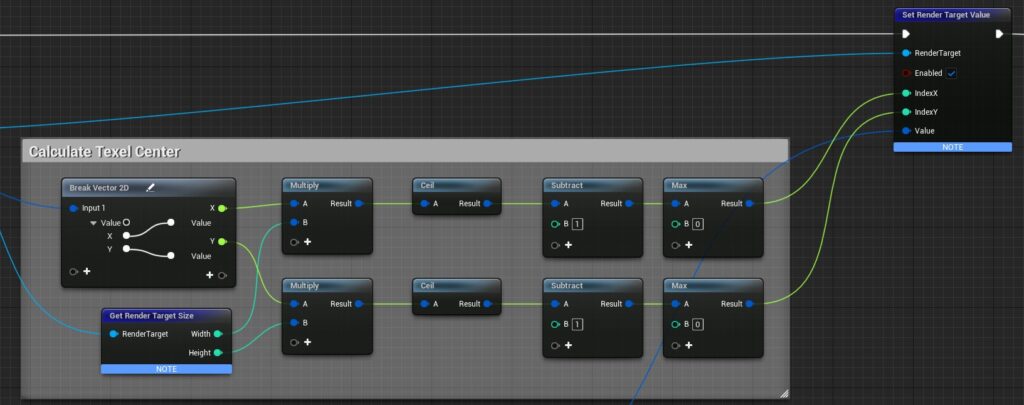
Basically, all you have to do is write to the Render Target with a node called Set Render Target Value, but you need to be careful here.
When writing, the value is naturally written to the Texel, but when reading Texture with UV, if the UV position is not at the center of the Texel, the value is a linear completion of the two Texel values.
This is usually not a problem when reading such as color information from Texture, but when you want to read independent information for each vertex, as in this case, it would be wrong if the information is complemented with unrelated information in neighbor texels. Therefore, it is necessary to ensure that the write and read locations are the same (i.e., only the center of the Texel is used).
Based on this, the write side should multiply the UV by the size of the Render Target, and then Ceil -> Subtract 1 -> Max 0.
Now that the implementation of Niagara is complete, place the Niagara System on the level and move it around appropriately, and you will see that values are written to the Render Target.
4. Deform the Mesh using World Position Offset in the Mesh material
Finally, we will deform the target Mesh by World Position Offset in its material with the Render Target to which the Particle’s position difference is written.
What is only important here is to adjust UV values to read the center of the Texel as described above.
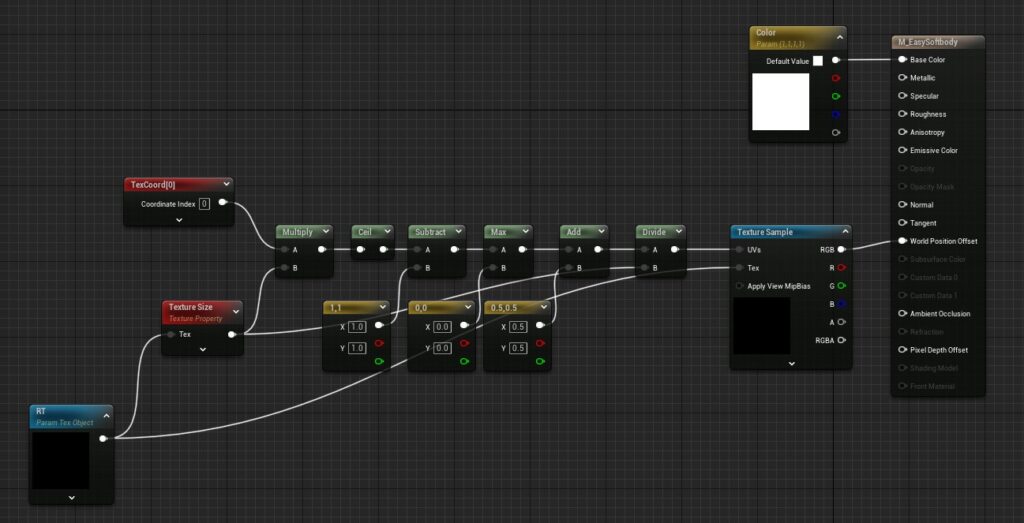
After the same process as writing in Niagara, the value can be added to 0.5 and divided by Texture Size to get the UV value of the center of the Texel.
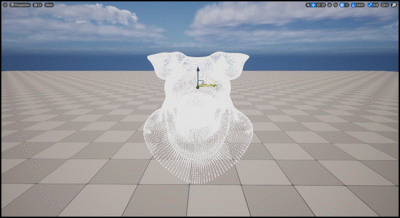
Place a target mesh with this material assigned on the level, place the Fake Soft Body Simulation Niagara on the child of the mesh, and move the mesh.
Now you can see the Easy(Fake) Soft Simulation, as shown in the video at the beginning of this article!
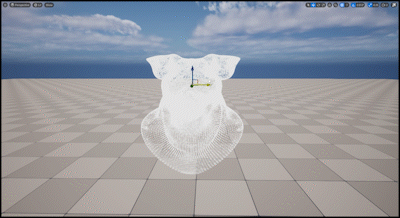
Bonus
This is the end of the explanation.
I have just played around to make it playable and operable like below.
Conclusion
The explanation is a bit long, but the implementation itself is very simple, and the fact that it is so easy to create a soft body-like appearance is also amazing.
Now, while fake soft body simulation is easy to create, you may want to try real soft body simulation.
I would try that in the future!


