Introduction
Note: I wrote this article with UE 4.27 data, so it might have some changes in the latest UE version.
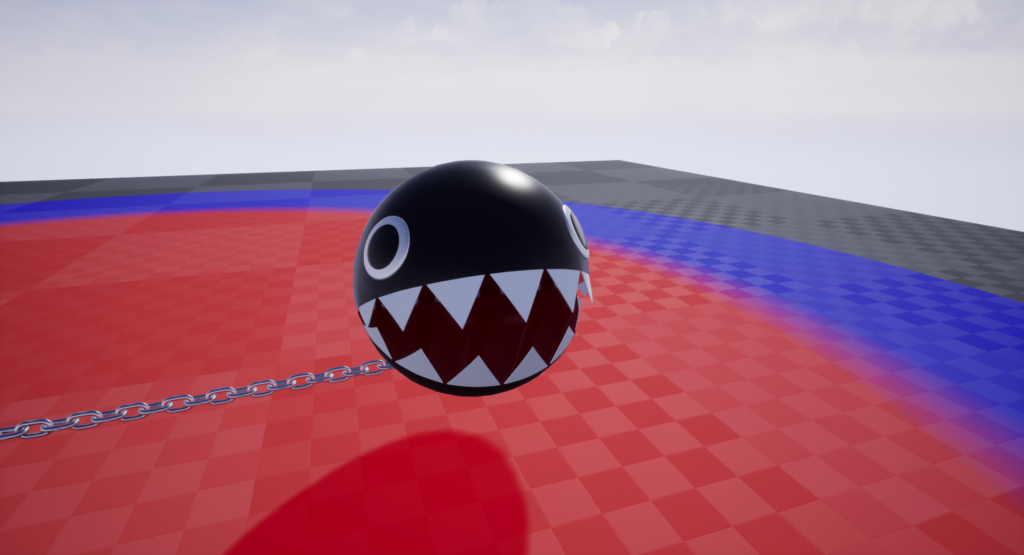
In this article, I’ll explain how to create Mario’s Chain Chomp!
That being said, the main focus here is how the movement of the chain connected to the Chain Chomp is created in Niagara.
The chain’s movement is simulated in real time using the Position Based Dynamics (PBD) method, through the Simulation Stage feature in Niagara.
I have previously written an explanation about the Simulation Stage, so please refer to that article for more details.
Additionally, the chain simulation itself is based on an Epic sample that I have slightly modified. I’ve written an explanation about that sample before as well.
In this article, I will focus on explaining the specific modifications I made to the sample, so I recommend reading the following article first before continuing with this one.
I apologize for the number of preparatory articles, but the content of this article will be broken down into three main sections:
- Modifying the chain simulation sample to enable collision detection
- Setting up the Chain Chomp’s chain simulation
- (Bonus) Controlling the movement of the Chain Chomp
The data is also available in the link below. If you want to see the actual working data, please check it out.
Chain Simulation in Niagara – Create Mario’s Chain Chomp
Modifying the Sample to Enable Collision Detection
First, copy the Chain_SimulationStages Niagara System from the sample and disable the unnecessary modules.
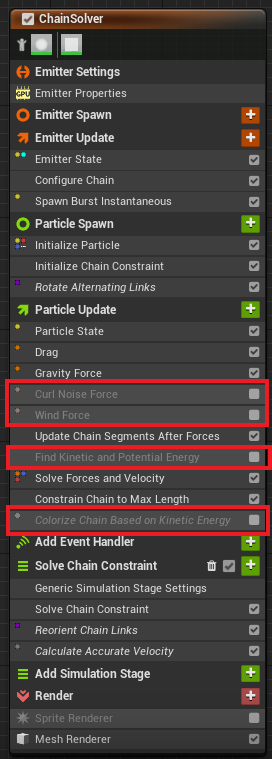
The Curl Noise Force and Wind Force are used to move the chain with external forces, but since we are working on a simple case where we want to detect collisions, we will disable them.
The Find Kinetic and Potential Energy and Colorize Chain Based on Kinetic Energy modules are used to visualize areas with stronger forces, but these can also be disabled for our purposes.
Next, the starting point of the chain is set to sway, so we will disable that motion.
Set the Chain Origin Offset in Update Chain Segments After Forces to (0, 0, 0).

With these settings, the chain will only hang down due to gravity and will no longer move.
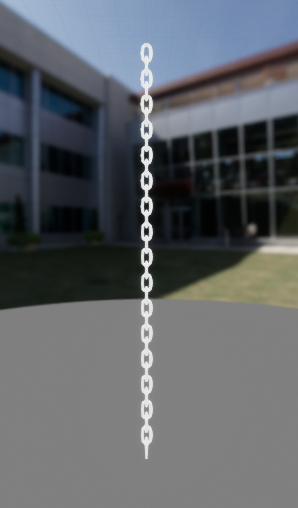
Next, let’s use a Blueprint to make the starting point of the chain movable via keyboard input.
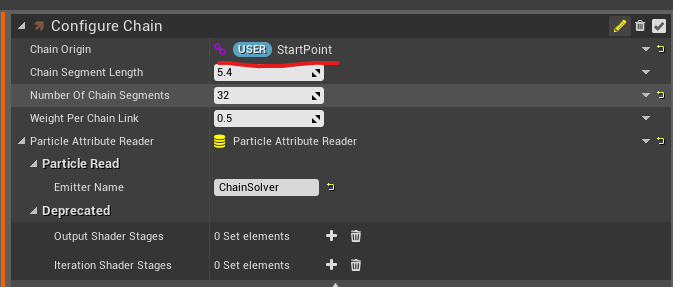
First, create a StartPoint Vector user parameter and set it in the Chain Origin in Configure Chain.
Then, create a suitable actor blueprint, add Niagara and a sphere, and assign the modified Niagara System to the Niagara component.
Set up the Blueprint nodes to move the sphere left and right using keyboard inputs.
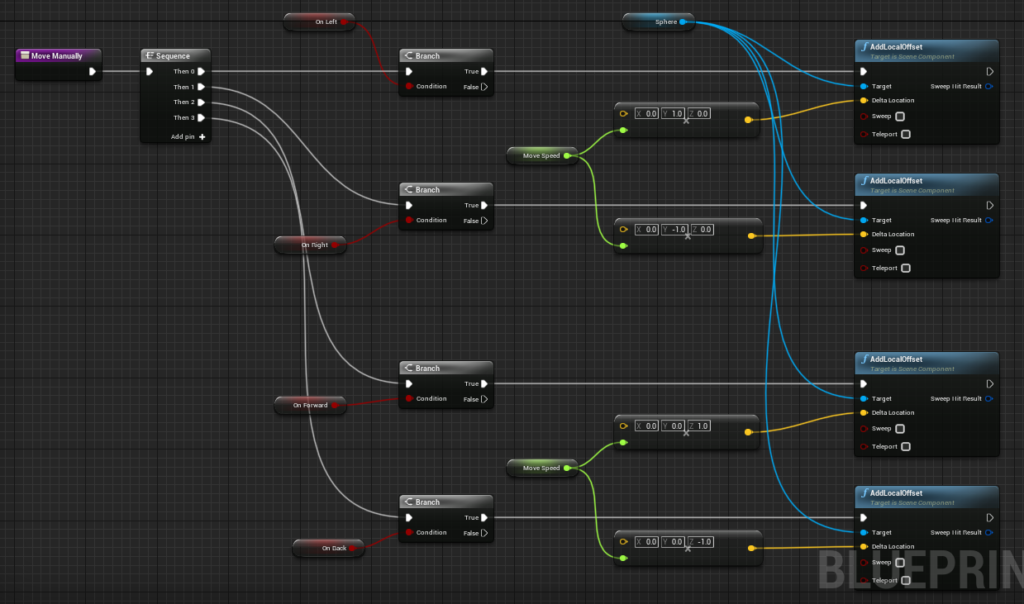
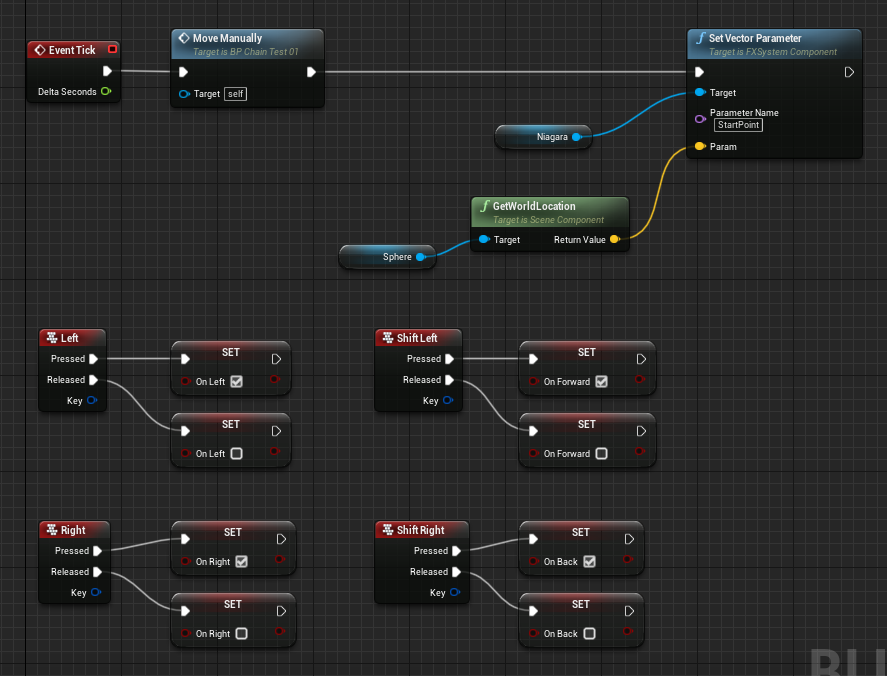
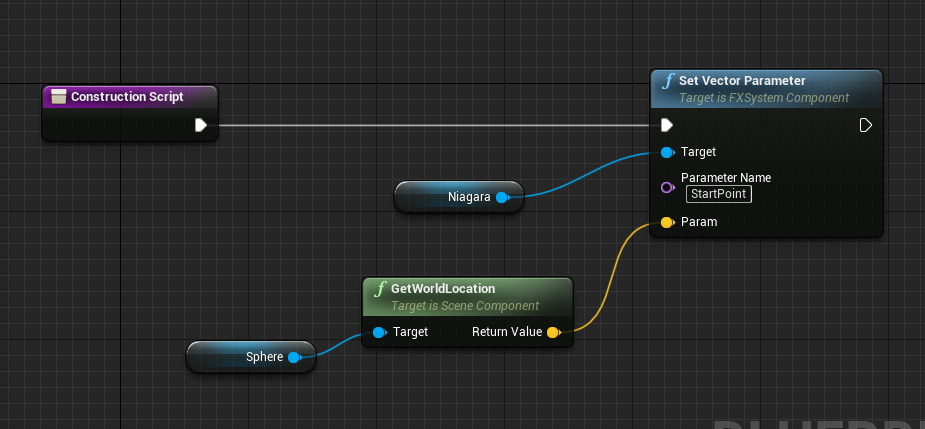
Finally, in the Construction Script and Event Graph‘s Tick, send the sphere’s world location to the StartPoint parameter in the Niagara system.
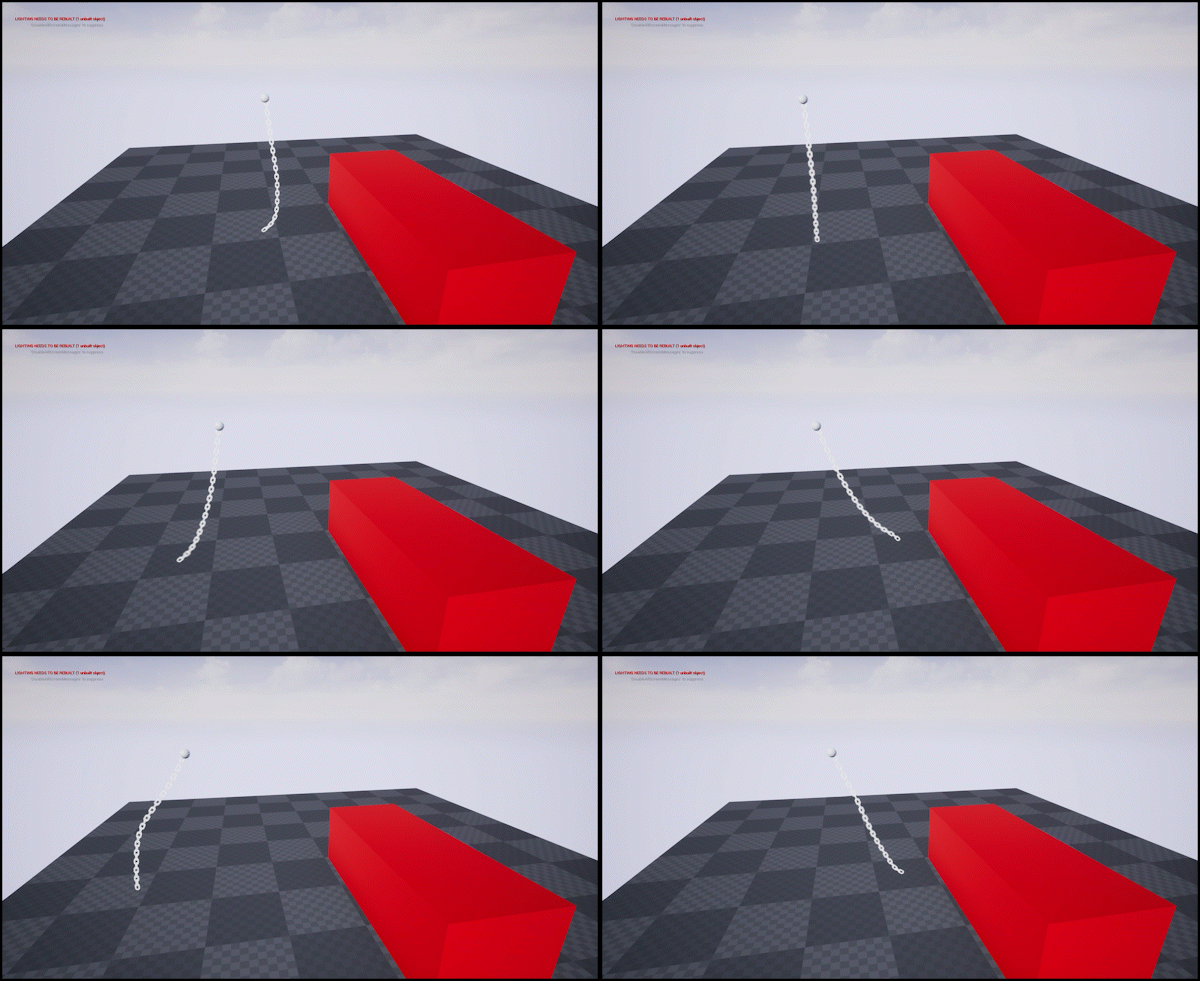
Now, the starting point of the chain can be moved with the keyboard, and the chain will move naturally along with it.
Now, let’s set up collision detection. This is done by simply adding the standard Collision module from Niagara.
When you add it, you might get an error at first, but pressing the Fix Now button and moving the module above Solve Forces and Velocity should solve the problem.
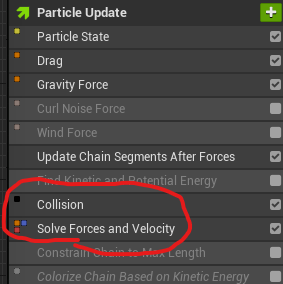
Keep in mind that since we are using the Simulation Stage, we must use GPU simulation.
For GPU simulation, there are three types of collision detection methods:
- GPU Depth Buffer: Collision detection based on depth values from the camera.
- GPU Distance Fields: Collision detection based on global distance fields.
- Analytical Planes: Collision detection using pre-configured infinite planes (up to two).

At this point, neither GPU Depth Buffer nor GPU Distance Fields seem reliable for use in a real game environment.
Here’s a brief explanation of each method:
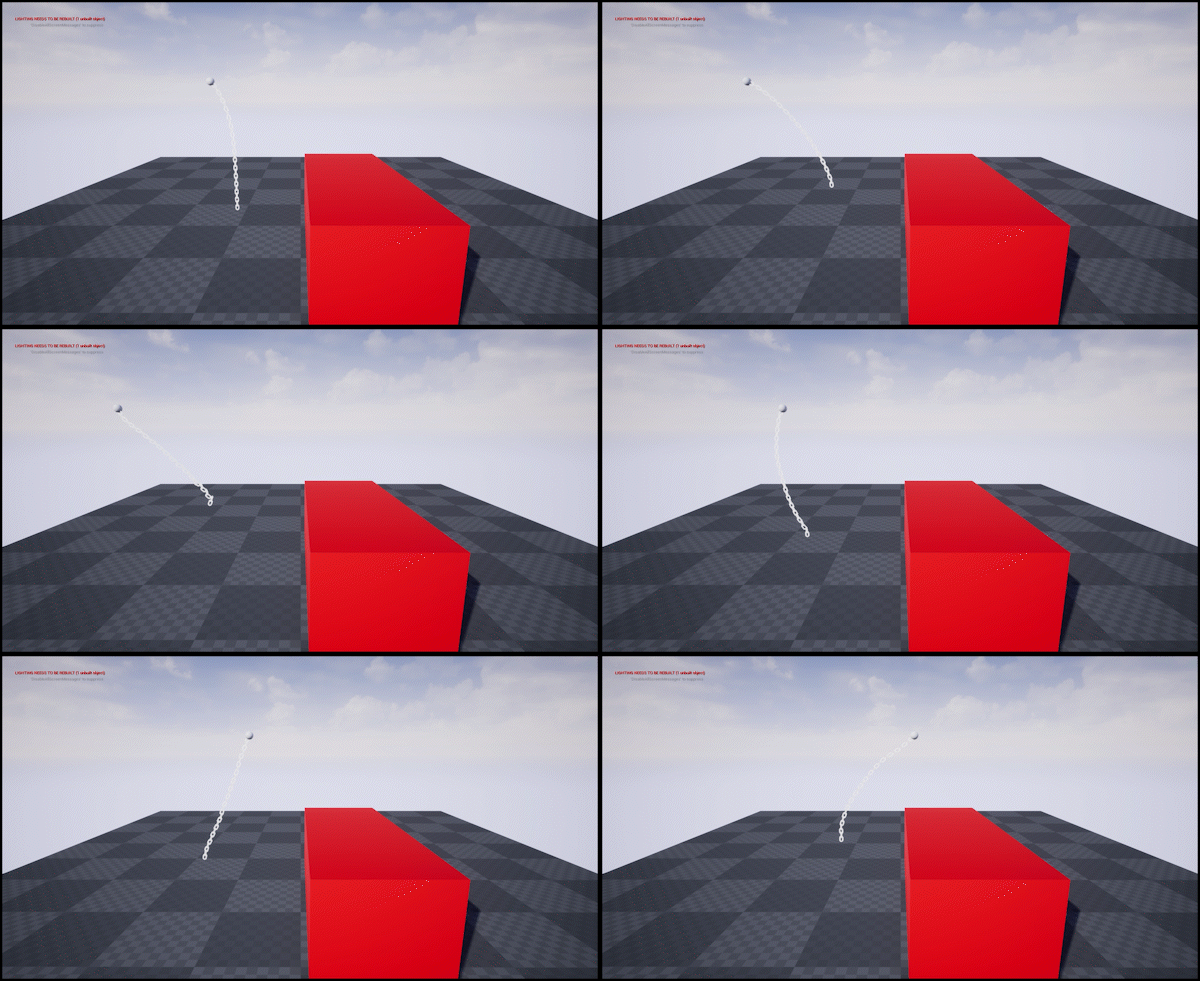
GPU Depth Buffer: In its default setup, the chain will fly off. This is likely because the collision detection is affecting the Mesh Particles themselves, but this needs further investigation.
By unchecking Kill Occluded Particles, you can avoid the chain flying off, but the behavior when moving the chain becomes unnatural.
GPU Distance Fields: This method is slightly better, but the collision is not accurate, and there are instances where the chain unexpectedly flies off.
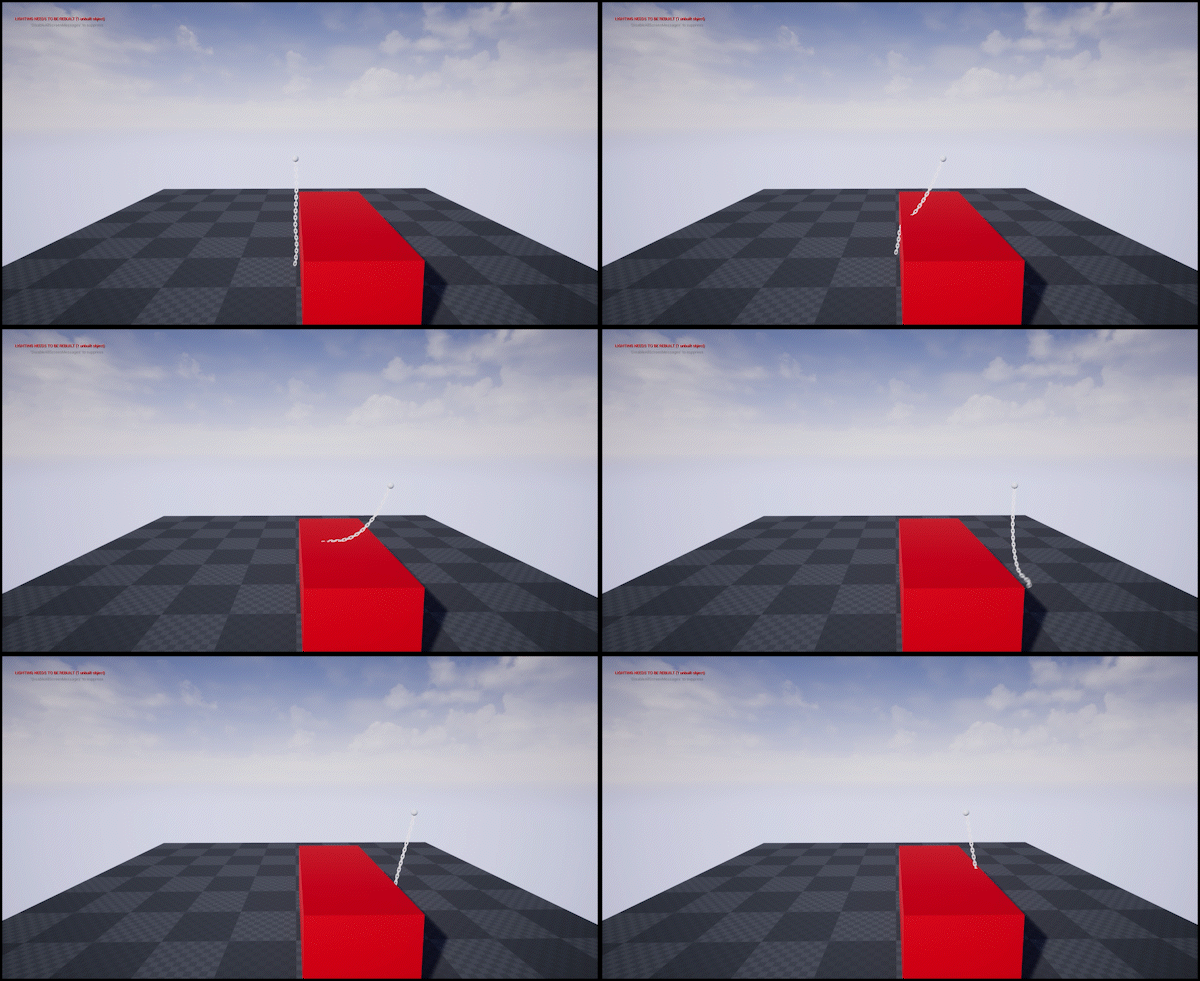
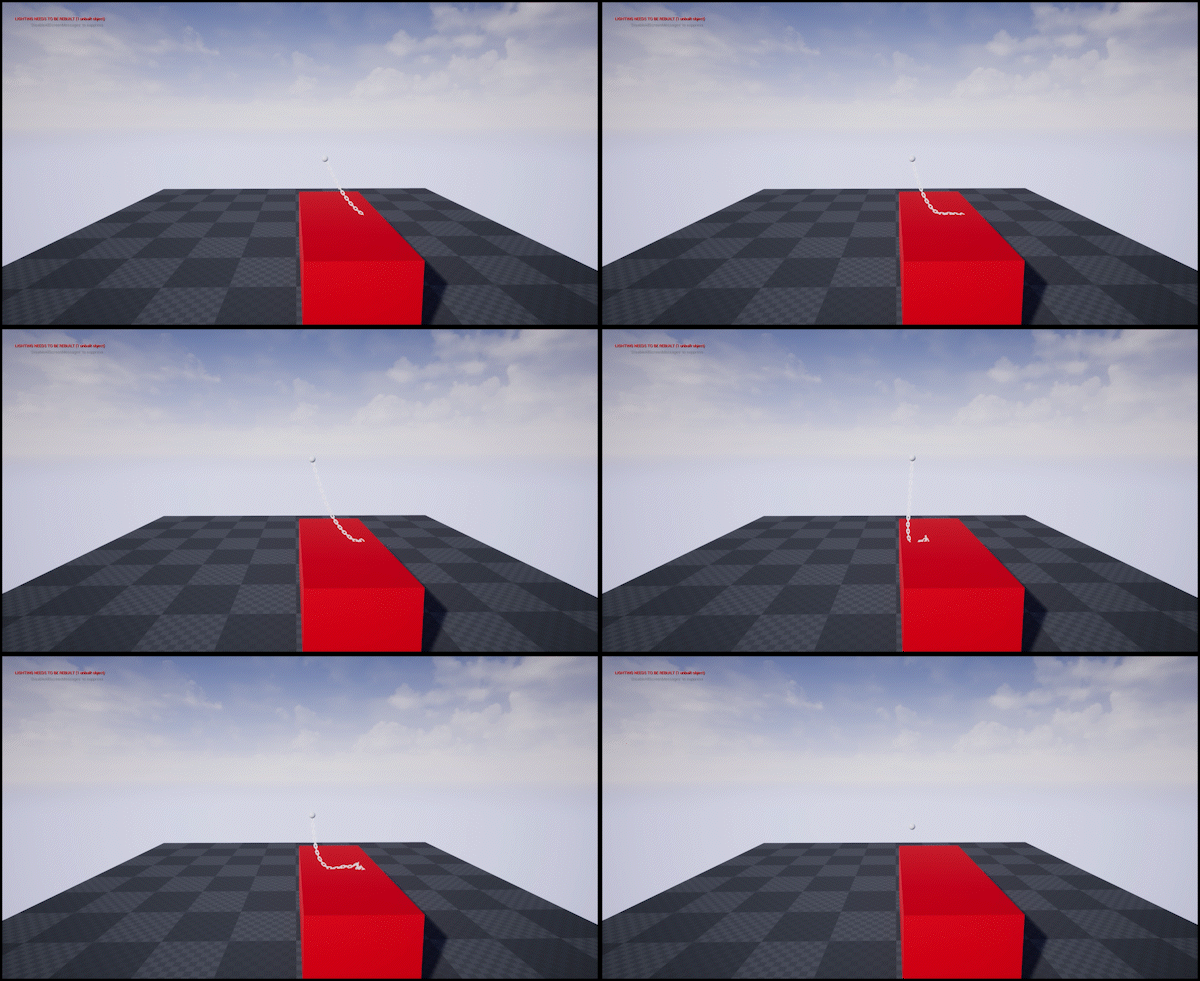
This issue seems to be related to the Global DistanceField’s accuracy, so accurate collision detection may not be possible unless the precision of the Global DistanceField is improved.
Analytical Planes: This method allows for highly accurate collision detection, and the chain doesn’t suddenly fly off. It is a good option if you only need to detect collisions with a floor, for example.
In the Chain Chomp example, I am using Analytical Planes to detect collisions only with the floor.
※ When it comes to Collision, it still needs further research. It might be improved if you implement collision detection within a simulation stage.
Setting Up the Chain Chomp’s Chain Simulation
Now we’ll move on to setting up the Chain Chomp itself!
There’s not much to do here. Compared to the previous steps, we just need to fix both the start and end points of the chain.
The overall structure looks like this. In addition to the parts we disabled earlier, we will also disable Constrain Chain Max Length. This is because, in this setup, we are fixing both ends and controlling the movement via Blueprint, so depending on the timing, the chain might exceed the pre-set maximum length.
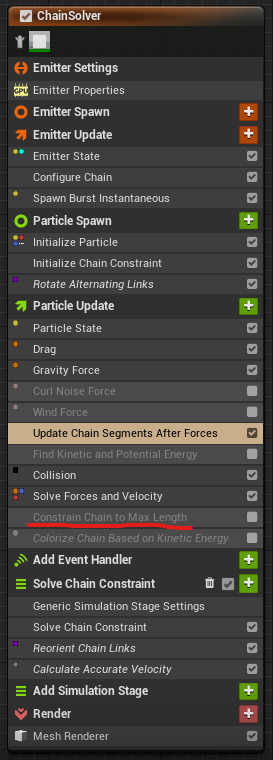
We also need to apply the modifications made to prevent not only the start point but also the end point from being affected by the simulation.
First, create the user parameters ChainEnd and ChainStart. These will be used to set the fixed positions later (more on the scale settings below).
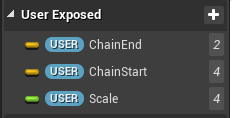
As with the previous section, set ChainStart to the Chain Origin in Configure Chain.
Next, slightly modify the contents of the Initialize Chain Constraint scratchpad.
Originally, only the ChainStartPoint had an InverseMass of 0, so change the ChainEndPoint to also have an InverseMass of 0. InverseMass is used later to disable velocity.
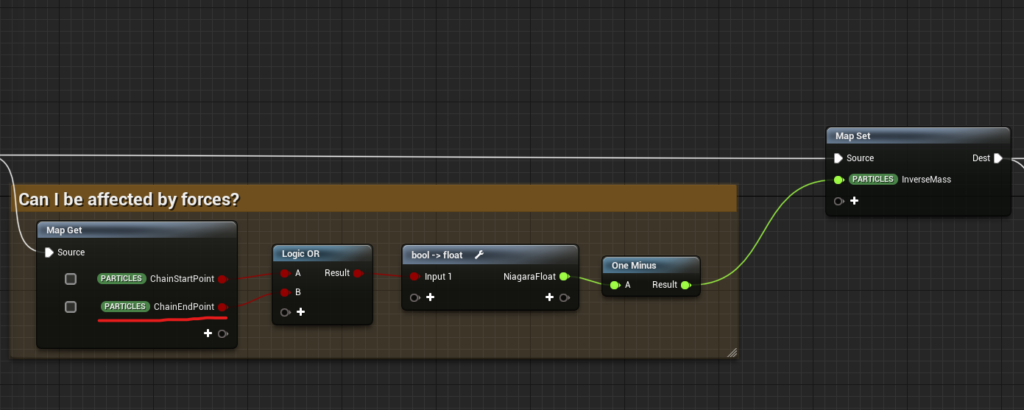
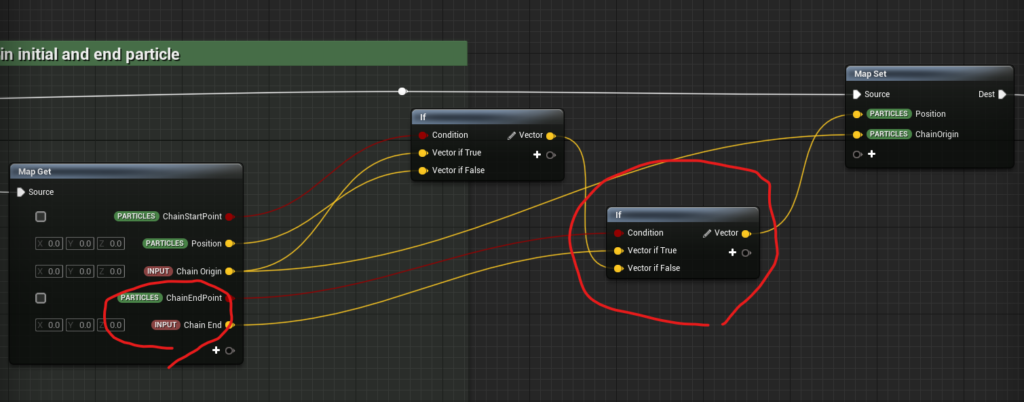
Next, modify the contents of Update Chain Segments After Forces.
Here, we set the position of the particle we want to fix to an arbitrary location. Only the ChainStartPoint was originally fixed by applying an offset to the Chain Origin, but now we remove the offset and just set the ChainStartPoint to be Chain Origin input as well as the ChainEndPoint to be Chain End input.
Then fixing its position with set the previously created ChainStart and ChainEnd parameter for those inputs.

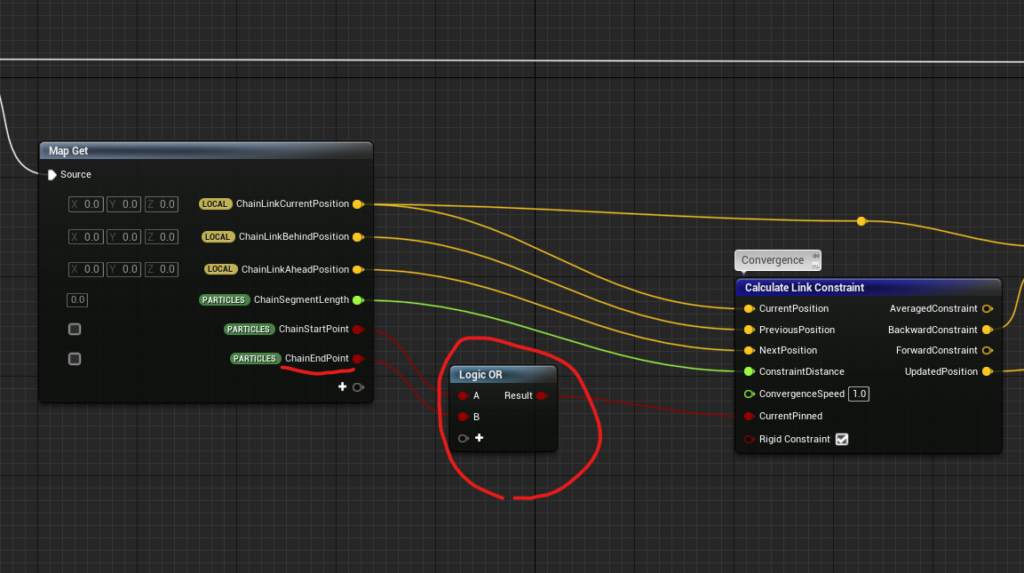
Finally, make minor adjustments to Solve Chain Constraint to finalize the fixed position at the end point.
To the flag given to the CurrentPinned in the Calculate Link Constraint, simply add the ChainEndPoint. This will exclude both the start and end points from the simulation calculations.
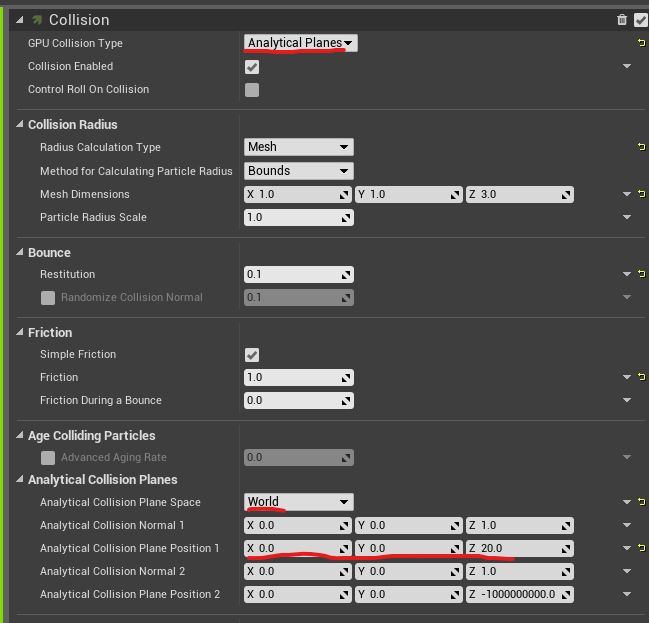
Now, for collision detection, as mentioned earlier, we set Analytical Planes and configure Analytical Collision Plane Position 1 to (0, 0, 20) in world space, which aligns with the floor.
Other values such as Radius, Bounce, and Friction can be set arbitrarily, so don’t worry too much about them.
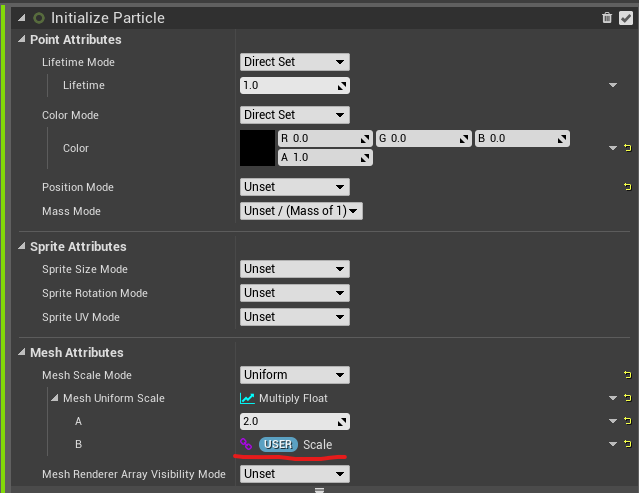
Lastly, I will explain the Scale parameter.
To make the chain’s size adjustable, we added a Scale parameter. There are two places where this scale must be applied:
- Multiply it with the mesh particle size.
- Apply it to the Chain Segment Length in Configure Chain to maintain the correct length, as improper scaling here will cause issues in the simulation.
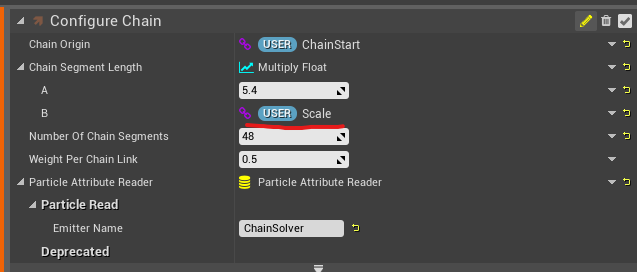
With that, the Niagara setup is complete.
Next, let’s proceed with setting values for ChainStart and ChainEnd in the Blueprint.
The fixed positions are set as shown in the image below. ChainEnd remains fixed, but ChainStart will be updated every frame based on the movement of the Chain Chomp.
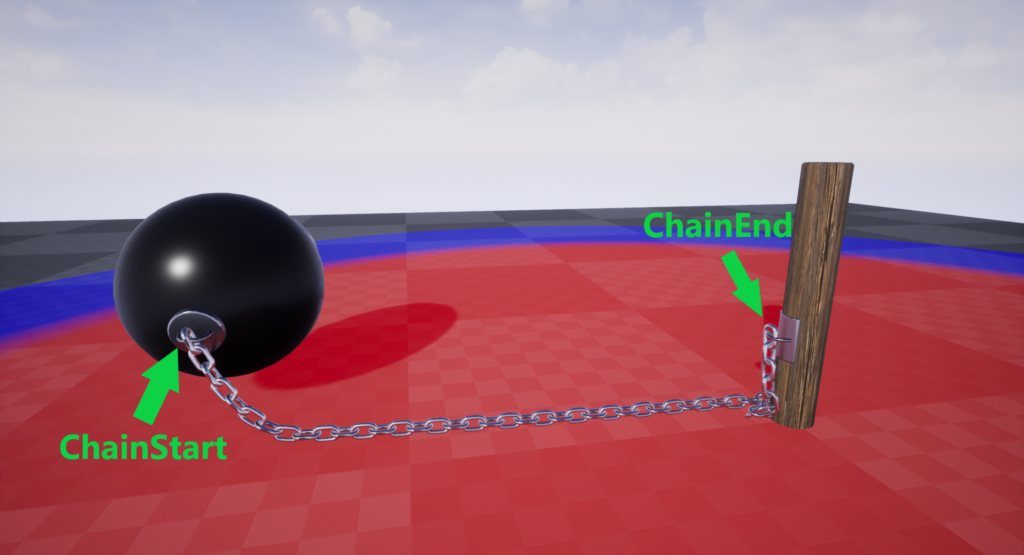
In the Construction Script, assign the World Position of the Pile Attach to ChainEnd, and the World Position of the Wan Wan Attachment to ChainStart.
※ By the way, Wan Wan is the Japanese name of Chain Chomp.
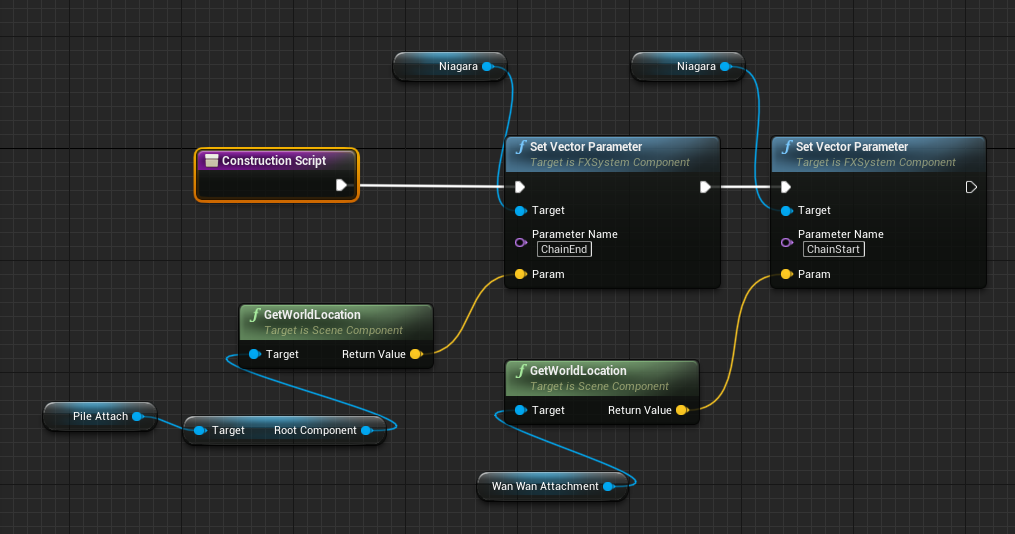
Pile Attach is placed at an appropriate world position and assigned to the relevant Blueprint variable.
Wan Wan Attachment is a hidden sphere child of the Chain Chomp’s static mesh.
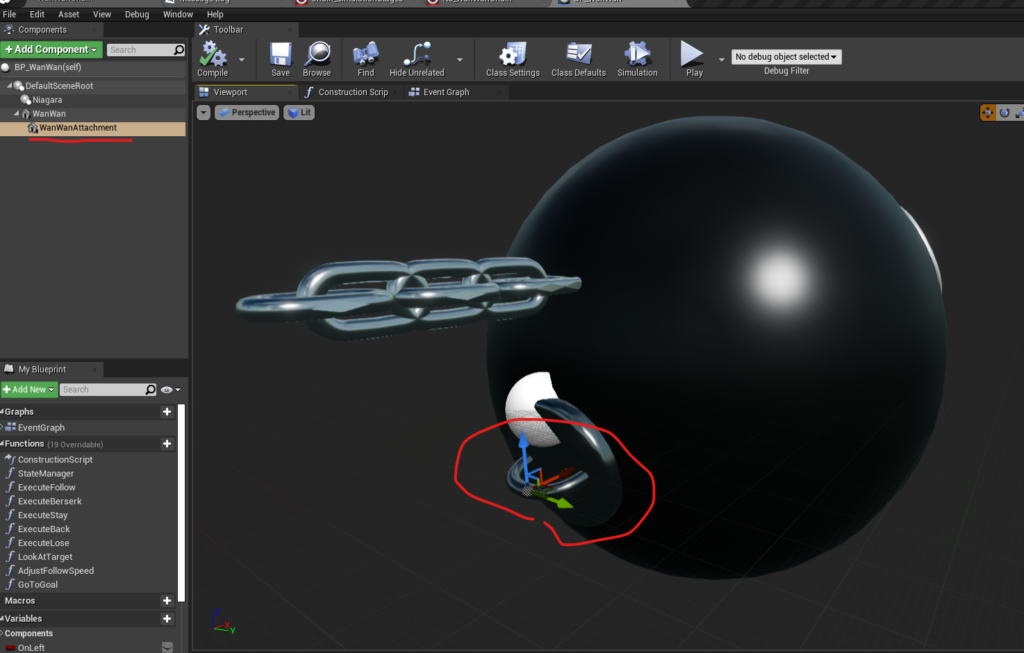
Finally, in Event Tick, update ChainStart with the world position of Wan Wan Attachment.

That’s the setup for the Chain Chomp’s chain simulation!
(Bonus) Controlling the Movement of the Chain Chomp
The explanation for the PBD-based chain simulation in this article is complete. However, as a bonus, I will quickly explain how the movement of the Chain Chomp is controlled in Blueprint.
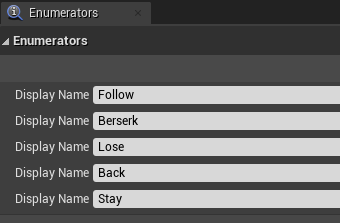
First, we define the Chain Chomp’s states. There are five states, which are set as Enumerators:
- Follow: The Chain Chomp chases the player in the red zone.
- Berserk: The Chain Chomp chases the player in the blue zone but is stopped by the chain.
- Lose: When the player exits the blue zone, the Chain Chomp loses interest and turns back to the starting position.
- Back: The Chain Chomp returns to its starting position.
- Stay: The Chain Chomp stays at the starting position.
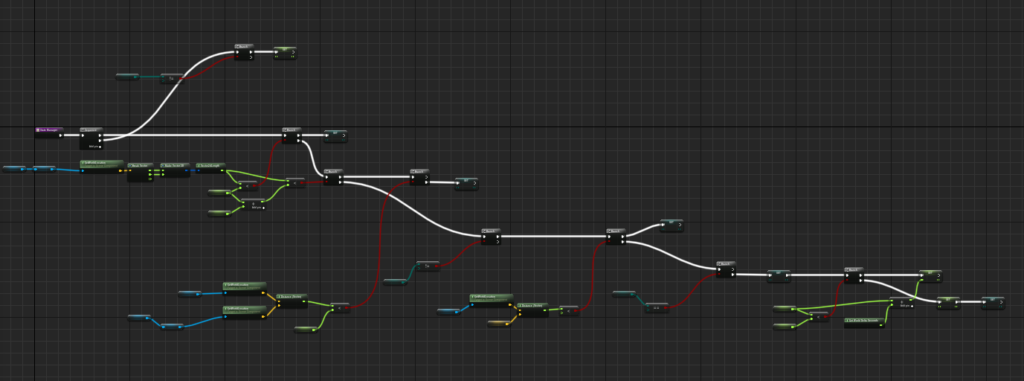
Each state’s transition is evaluated every frame based on the player’s and Chain Chomp’s position, as well as the chain’s length. These transitions are handled by a State Manager function. (Details omitted for brevity.)
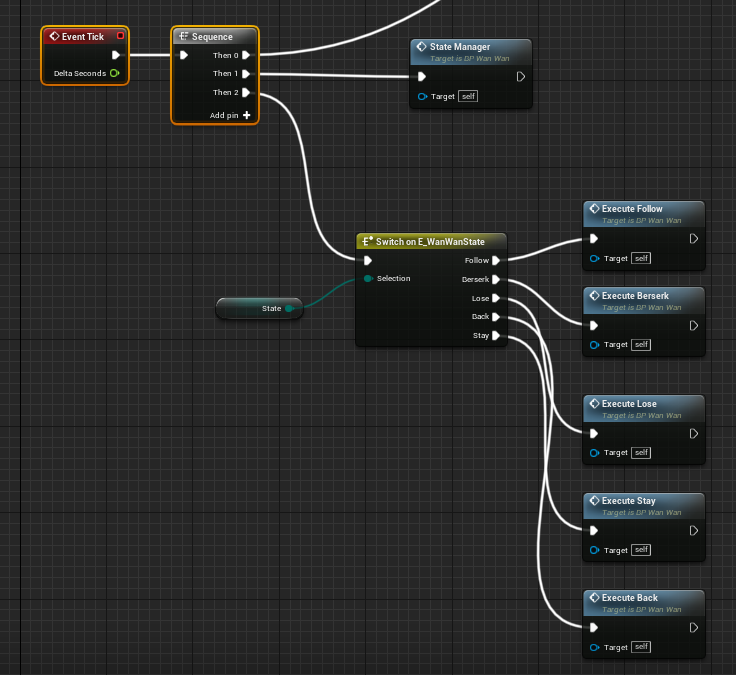
Each state corresponds to specific actions that are implemented as functions. These functions are executed based on the current state.
While I won’t go into details on each function, here are some tips for controlling the movement:
- Natural Chase Movement: Use Lerp to make the Chain Chomp move faster when further away from the target, and slower as it gets closer.
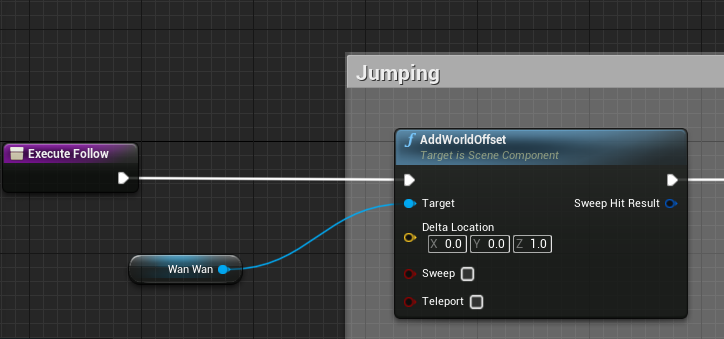
- Bouncing Movement: Use AddWorldOffset with upward movement to simulate a bouncing effect.
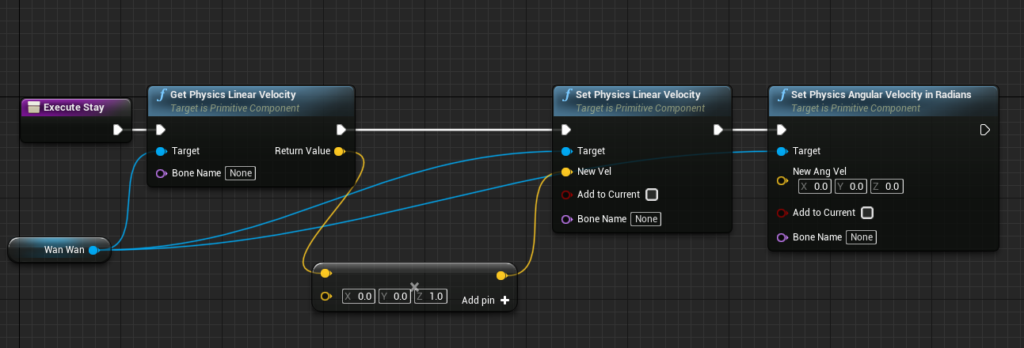
- Disabling Inertia:
Since the Chain Chomp has collision enabled and is using physics behavior, I found that it wouldn’t stop properly when reaching the maximum chain length at first.
To fix this, I decided to simply remove the physical velocity. By setting Set Physics Linear Velocity to 0, you can override the velocity calculated by the physics engine, causing the object to stop immediately.
If you also want to disable rotation, just set Set Physics Angular Velocity in Radians to 0, and that will do the trick.
That wraps up the explanation!
Conclusion
When I saw the chain simulation sample in Niagara by function, I thought, “I want to make it interactive with collision!” and started brainstorming for a good subject. For some reason, the idea of “Mario’s Chain Chomp” popped into my head.
However, the collision didn’t work as well as I expected, and it doesn’t seem like it will be easy to improve. So, practical interactive PBD simulations will need a bit more thinking and refinement.
Even so, I think it’s really convenient to easily create relatively natural chain behaviors like this, and PBD methods have various potential uses beyond just chains, so I’m looking forward to exploring this further!
By the way, I modeled the Chain Chomp in Houdini! It turned out surprisingly cute 🙂
